To trigger an AWS Lambda function from an SQS queue and store the received messages in an S3 bucket, you begin by creating an Amazon SQS queue that will act as the event source. After setting up the queue, configure an AWS Lambda function that will process incoming messages. In the Lambda console, you add SQS as a trigger and select your queue, allowing AWS to automatically poll the queue and invoke your function whenever new messages arrive.
Inside the Lambda function, the event object contains the SQS messages in a Records array where each record holds the message body. Your function extracts this body and prepares it for storage. Next, ensure that the Lambda execution role has permission to read from SQS and write to Amazon S3 by attaching the appropriate IAM policies. After that, create an S3 bucket where the messages will be stored. Within your Lambda code, import the AWS SDK (boto3 in Python) and use the S3 client to upload the message content as an object to the bucket, typically using a unique filename such as a timestamp or UUID.
Once everything is configured, deploy the function so AWS can use it in production. When a new message is sent to the SQS queue, AWS Lambda automatically retrieves it, runs your handler code, and writes the message body to the S3 bucket. You can monitor the flow using CloudWatch Logs to confirm that messages are successfully consumed and stored. This setup provides a scalable, serverless pipeline that reliably transfers queued messages into persistent S3 storage.
Step 1: Sign to the AWS Management Console
1. Click on the Open Console button, and you will get redirected to AWS Console in a new browser tab.
2. Copy your User Name and Password in the Lab Console to the IAM Username and Password in the AWS Console and click on the Sign in button.
Step 2: Build an S3 Bucket
In this step, we will set up an S3 bucket called mysqslambda. This bucket will be used to hold the messages that come in from the flash sale event.
1. Ensure you are in the N. Virginia Region.
2. Go to the Services menu at the top and choose S3 under the Storage category.

3. On the S3 dashboard, click on Create bucket.
General Settings:
Bucket type: General purpose
Bucket name: Type mysqslambdafunction

NOTE: S3 bucket names must be unique across the world, so choose a name which is available
- Object ownership: Choose ACLs disabled (recommended) option.
- Block Public Access settings for the bucket:
Remove the tick from the Block all public access box.
Mark the checkbox that says I acknowledge under the warning message.
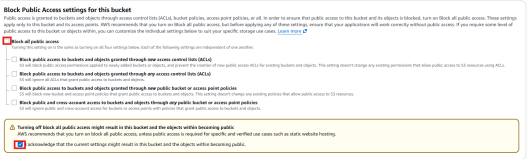
- Leave other settings as default.
- Click on Create bucket.
- You will be able to see the now S3 bucket below.

Step 3: Set Up an SQS Queue
In this step, we will create an SQS queue. This queue will work as a buffer, holding the messages coming from the flash sale before they are processed by the Lambda function.
1. Go to SQS by selecting Services at the top, then choose Simple Queue Service under the Application Integration category.
2. Confirm you are in the US East (N. Virginia) region.
3. Click on Create queue.
4. Under Details:
- Type: Standard queue
- Name: Type Jeevi_sqs_queue.
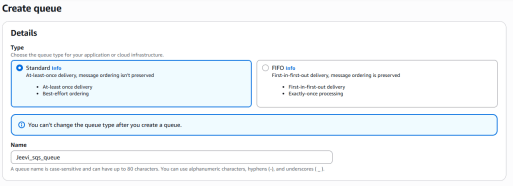
5. Leave other settings as default, Click on Create queue.

Step 4: Set Up a Lambda Function
In this step, we will build a Lambda function. This function will handle the messages coming from the SQS queue and save them into the S3 bucket.
1. Go to the Lambda service. Open the Services menu at the top, then choose Lambda under the Compute category.
2. Make sure you are in the US East (N. Virginia) area.
3. Click on “Create a function” button.
- Choose Author from scratch.
- Function name: Type my_sqs_Lambda.
- Runtime: Pick Python 3.14.
- Permissions: Click Change default execution role and select Use an existing role.
Existing role: Choose lambda_sqs_role_RANDOM_NUMBER from the dropdown.

- Press Create function.
4.Double-click lambda_function.py to open it in the editor.
5. In the Code source panel, delete the current code and paste the new code provided.
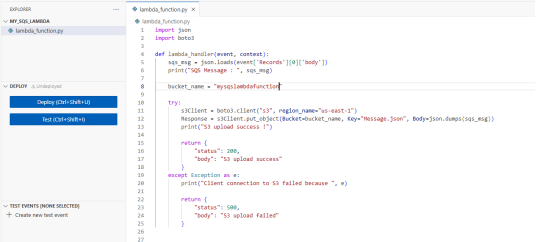
Note: Be sure to update the bucket name inside the code with the actual S3 bucket name you created earlier.
6. Click Deploy to save and apply the Lambda function code changes.
Step 5: Add a Lambda Trigger
In this step, we will link the SQS queue to the Lambda function. When new messages arrive in the queue, Lambda will automatically run, handle the messages, and store the data in the S3 bucket. This makes sure every incoming message activates the Lambda function to execute its logic.
- In the Lambda console, go to Configuration, then open the Triggers section.

The SQS queue should already appear chosen automatically. If it isn’t selected, choose the queue you created earlier in step 3 and press the Edit button. Tick the Activate Trigger checkbox, then click Add.

Task 6: Test the Lab
1. Go to the SQS queue, then click on the Send and receive messages button on the top-right corner.
2. Under the “Send message” tab:
In the Message body, type:
{“Name” : “Paul”, “Course” : “Amazon Web Services”, “Cost” : “$20”}
- Now press the “Send message” button.

4. Next, open the S3 Console. Go to the S3 bucket that you created earlier.
5. You should now see a new object created. Its name will be Message.json. Click on the object to open it.
6. Select the file and press the Open button. The file will be downloaded to your system.
7.Open the downloaded file, and you will be able to view the message you sent from SQS.

Conclusion:
- SQS successfully triggers Lambda.
- Lambda successfully stores messages in S3.
Fast, and reliable serverless workflow .
- For more information about AWS SQS, you can refer to Jeevi’s page.