
Introduction
Amazon ECS is a fully managed container orchestration service that helps you run, manage, and scale Docker containers on AWS. It removes the need to set up your own container management system by providing built-in scheduling, networking, and scaling features, so you can easily deploy containerized applications with high reliability and performance.
Lab Steps
Step 1: Sign to the AWS Management Console
1. Click on the Open Console button, and you will get redirected to AWS Console in a new browser tab.
2. Copy your User Name and Password in the Lab Console to the IAM Username and Password in the AWS Console and click on the Sign in button.
Step 2:Create a Key Pair for EC2 Instances Used in the ECS Cluster
- Ensure you are working in the N. Virginia (us-east-1) region. From the AWS Management Console, open the Services menu and select EC2 under the Compute category.

4. In the EC2 dashboard, go to the left-hand panel and scroll to the Network & Security section. Select Key pairs.

5. Click the Create key pair option to generate a new key.
- Provide the following details:
- Name: JeeviPair
- Key pair type: RSA
- File format:
- .pem for Linux and macOS
- .ppk for Windows (for use with PuTTY)
6. Keep the remaining settings unchanged.
7. Finally, click Create key pair to download and save the file.

Step 3: Launching an ECS Cluster
- Confirm that you are operating in the N. Virginia (us-east-1) region. From the AWS Console, open the Services menu and choose Elastic Container Service under the Containers category.

2. In the ECS dashboard, go to the left navigation pane and click Clusters. Then select Create cluster to begin the setup.

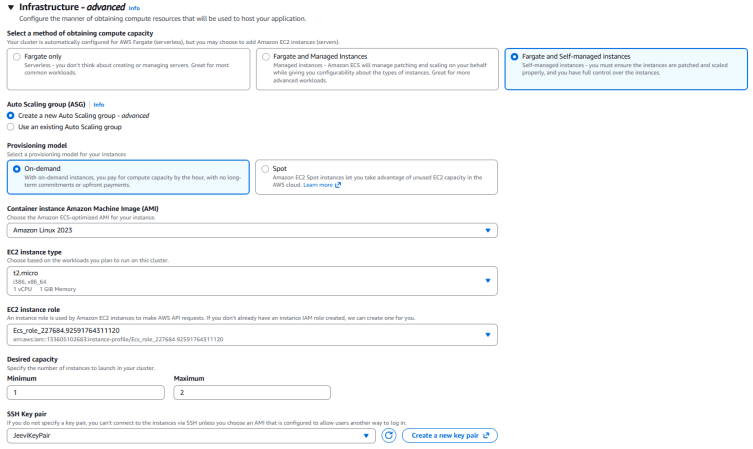
3. Cluster Configuration
- Cluster name: Jeevicluster

4.Infrastructure Settings
- Compute options: Select Fargate and Self-managed instances
- Auto Scaling Group (ASG): Choose Create new Auto Scaling Group
- Provisioning model: Set to On-demand
- Container instance AMI: Select Amazon Linux 2023
- Instance type: Choose t2.micro
- EC2 instance role: Select the existing role ECS_Role
Capacity settings:
- Minimum capacity: 1
- Maximum capacity: 2
SSH Key Pair: Choose JeeviKeyPair.
5. Networking Configuration
- VPC: Use the default VPC
- Subnets: Keep the default selections
6. Security Group:
- Select Create new security group
- Security group name: MySG
- Description: MySG

Inbound rule:
- Type: SSH
- Source: Anywhere
- All other settings can remain default.
- After reviewing the configuration, click Create.
- Your ECS cluster will now start provisioning. It may take a few minutes for the EC2 instance to launch and become available.

Step 4: Create Task Definitions
In this step, you will define a task definition for your ECS cluster. A task definition acts as a template that describes how tasks should run in ECS. It specifies details such as the containers to use, their resources, and runtime settings. Each task definition can include one or multiple containers that run together on either EC2 instances or Fargate.
- From the left navigation panel, select Task Definitions under the Amazon ECS section.
2. Click Create new task definition to begin.

Task Definition Configuration
- Task definition family: ecs-demo

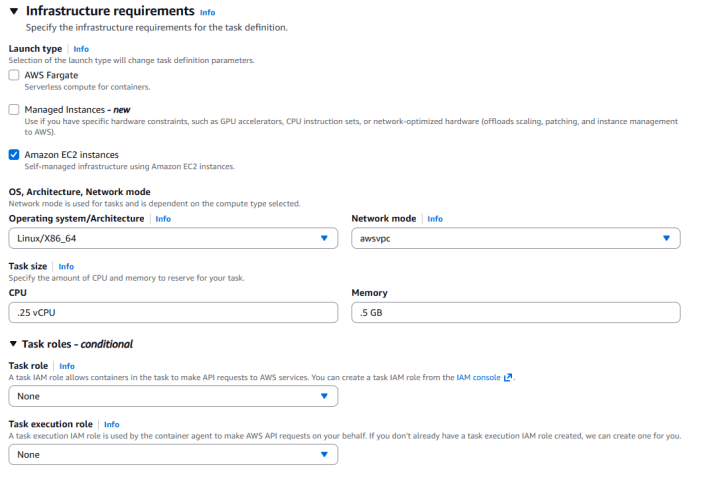
Infrastructure Requirements
- Launch type: Select Amazon EC2 Instances
- Task size:
- CPU: 0.25 vCPU
- Memory: 0.5 GB
- Task role: Select None
Task execution role: Select None
5. Container Configuration (Container 1)
- Name: httpd
- Image URL: httpd:2.4
6. Port Mappings:
- Container port: 80
- Protocol: TCP
- App protocol: HTTP

- Keep rest things as default . Click Create to finalize the setup.
- Your task definition ecs-demo has now been successfully created.
Step 5: Create a Service and Launch the HTTPD Container in ECS
In this step, you will create an ECS service and run the HTTPD container. In Amazon ECS, a service is used to maintain a specified number of running task instances. It continuously ensures that the desired number of tasks are active, automatically handling placement, scaling, and recovery as needed.
- From the left navigation panel, go to Task definitions under the Amazon ECS section.
- Select the task definition ecs-demo, click Deploy, and then choose Create service.

3. Service Configuration
- Task definition revision: Select the latest revision
- Service name: httpd
- The associated cluster will be auto-selected

4. Compute Configuration
- Compute option: Choose Launch type
- Launch type: Select EC2.

- In the Deployment settings:
- Scheduling strategy: Select REPLICA
- Desired tasks: 1

6. Networking Settings
- VPC: Use the default VPC
- Subnets: Keep the default selections
- Security group: Click Use an existing security group and select MySG

7. Leave all other settings as default and click Create.
8. Your service will now be created. Wait until the Deployments and Tasks sections show 1/1 tasks running.

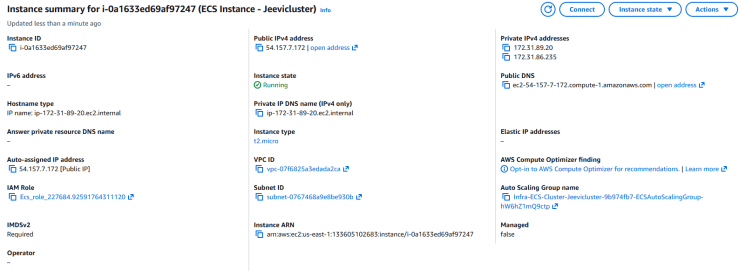
9. Next, open the Infrastructure tab and scroll down to the Container Instances section.
10. Click on the displayed EC2 instance ID to view the running instance details in the EC2 console.
Step 6: SSH into the EC2 Instance and Run Docker Commands
In this step, you will connect to the underlying EC2 instance that is part of your ECS cluster and verify the running Docker containers.
Since EC2 Instance Connect is not supported for ECS-managed instances, you must use an alternative SSH method (such as using your key pair through a terminal or PuTTY).
- Follow the standard procedure to SSH into the EC2 instance.
- Once connected, switch to the root user using:

3. Update the system packages:

4. Check the installed Docker version:
5. View all Docker containers currently running on the ECS instance:
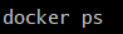

6. You should now see the default ECS agent container along with the httpd container that you deployed through your ECS service.
Conclusion:
- You have now successfully created and deployed an ECS cluster.
- You have also launched and verified the running HTTPD container within your ECS environment.
For more information about AWS ECS, you can refer to Jeevi’s page.