Introduction
As Kubernetes adoption grows, many beginners face the same challenge: Kubernetes is powerful, but complex. Writing YAML files for Deployments, Services, Ingresses, autoscaling, and environment-specific configurations can quickly become overwhelming—especially for students, interns, and engineers new to cloud-native technologies.
This is where KubeVela comes in.
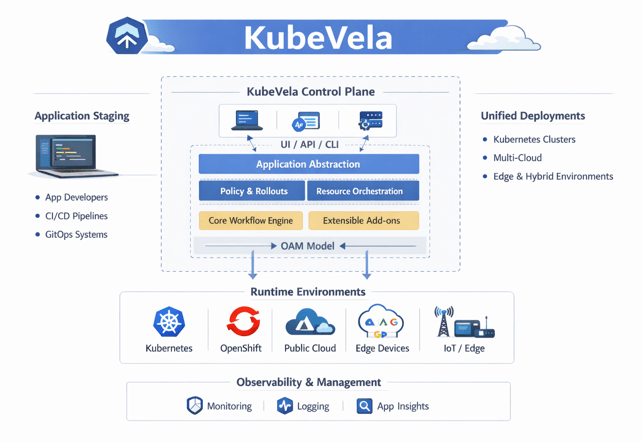
KubeVela is an open-source, modern application delivery platform built on top of Kubernetes and based on the Open Application Model (OAM). Instead of forcing developers to manage low-level Kubernetes objects, KubeVela allows applications to be treated as first-class objects, making deployment and operations simpler, clearer, and more consistent
Prerequisites
-
- kubectl installed & configured
-
- cluster admin permissions
-
- basic cluster resources
-
- Minimum 2 CPU + 4 GB RAMmission
What is kubeVela?
KubeVela is an open-source, application delivery platform built on top of Kubernetes and based on the Open Application Model (OAM).
It treats an application as a first-class object, not just a collection of Kubernetes resources, and provides a simple, consistent way to define, deploy, and manage applications across different environments.
What is standalone mode in kubeVela?
Standalone mode in KubeVela means that KubeVela is installed and runs entirely inside a single Kubernetes cluster. It does not depend on any external control plane or additional services. In this mode, KubeVela manages and deploys applications only within that cluster, making it simple to set up and easy to use. Standalone mode is ideal for beginners, learning environments, development, and small production setups where multi-cluster management is not required.
Why use kubeVela in standalone mode?
KubeVela standalone mode is used because it simplifies application delivery on Kubernetes. It removes the complexity of managing multiple clusters and focuses only on one cluster. Developers can deploy applications without worrying about Kubernetes YAML files, while operators can define reusable policies and configurations. This mode reduces operational overhead and is ideal for learning, development, and small production environments.
When should you choose kubeVela in standalone mode?
You should choose KubeVela standalone mode when you are working with a single Kubernetes cluster. It is best suited for beginners, students, proof-of-concept projects, development environments, and small teams. If multi-cluster management is not required, standalone mode is the right choice because it is easier to install, manage, and maintain.
How does kubeVela Standalone Mode Work?
In standalone mode, KubeVela runs as controllers inside the Kubernetes cluster. Developers define applications using KubeVela’s application model, and KubeVela translates these definitions into Kubernetes resources like Pods, Services, and Deployments. All decisions and operations happen within the same cluster, without communicating with any external system. This makes the workflow straightforward and efficient.
How to Install KubeVela in Standalone Mode?
KubeVela standalone mode is installed directly into an existing Kubernetes cluster, usually using Helm or the vela CLI. During installation, KubeVela creates required components such as Custom Resource Definitions (CRDs) and controllers. Once installed, the cluster is ready to manage applications using KubeVela’s application-centric approach.
Key Features of KubeVela Standalone Mode
KubeVela standalone mode provides application-centric deployment, separation of concerns between developers and operators, reusable components and traits, and simplified Kubernetes management. It allows teams to focus on application logic instead of low-level infrastructure details, all within a single cluster.
Advantages and Limitations of Standalone Mode
The main advantages of standalone mode are its simplicity, easy installation, and low maintenance. It is ideal for beginners and small environments. However, its limitation is that it manages only one cluster. For large organizations that need centralized management across multiple clusters, standalone mode may not be sufficient.
KubeVela Standalone vs Control Plane Mode
In standalone mode, KubeVela manages applications in one Kubernetes cluster only. In control plane mode, a central KubeVela instance manages multiple clusters. Standalone mode is simpler and beginner-friendly, while control plane mode is designed for complex, enterprise-level multi-cluster environments.
Use Cases of KubeVela Standalone Mode
Common use cases include learning Kubernetes and KubeVela, local development, testing environments, small production workloads, and single-cluster DevOps setups. It is also useful for teams that want a clean and structured way to deploy applications without managing Kubernetes complexity
Install VelaD (the Standalone Installer)
VelaD is a tool that installs:
-
- All required dependencies
-
- K3s (lightweight Kubernetes)
-
- KubeVela
-
- Vela CLI
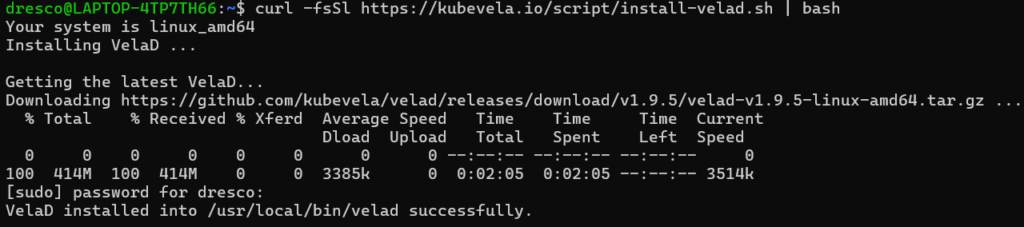
1.)Command:
curl -fsSl https://kubevela.io/script/install-velad.sh | bashExplanation:
-
- Downloads the VelaD installer from the internet
-
- Installs the
veladcommand on your machine
- Installs the
-
- Prepares tools needed to run KubeVela locally
Expected Output:
2.)Command:
velad versionExplanation:
-
- Shows the installed VelaD version
-
- Confirms VelaD is working correctly
Expected Output:

Setup KubeVela Locally
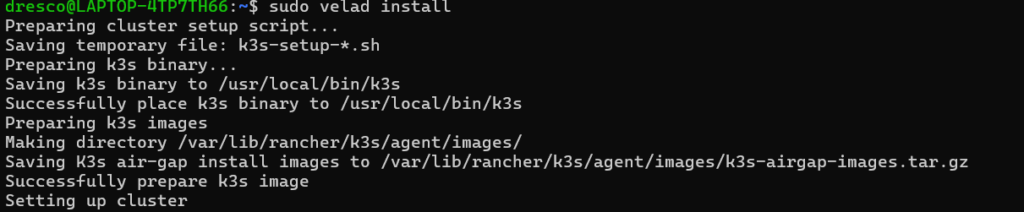
Command:
sudo velad installExplanation:
-
- Automatically creates a lightweight Kubernetes (K3s) cluster
-
- Installs KubeVela inside that cluster
-
- Sets up everything needed to run apps
Expected Output:
Connect Your Terminal to the Cluster
Export the kubeconfig so the vela command can talk to the cluster.
1.)Command:
export KUBECONFIG=$(velad kubeconfig --host)Explanation:
-
- Tells your terminal how to talk to the new cluster
-
- Works only for the current terminal session
Expected Output:

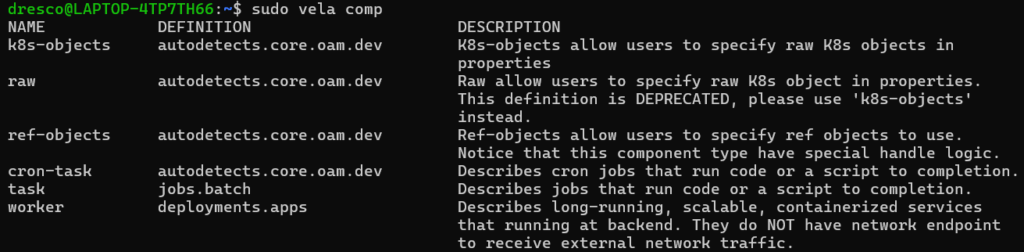
2.)Command:
sudo vela compExplanation:
-
- Displays built-in KubeVela component types
-
- Confirms that KubeVela is connected and working
Expected Output:
Install VelaUX Dashboard
VelaUX is a web UI to manage applications visually.
1.)Command:
mkdir -p $HOME/.kubeExplanation:
-
- Creates a
.kubedirectory in your home folder
- Creates a
-
- This is the standard place to store Kubernetes config files
Expected Output:

2.)Command
sudo cp /etc/rancher/k3s/k3s.yaml $HOME/.kube/configExplanation:
-
- Copies the Kubernetes cluster config file from the system folder to your personal folder.
-
- Needed because the original file is protected and only root can read it.
-
- After copying, your normal user can connect to the K3s cluster using this file.
-
- This makes
velaandkubectlwork without usingsudoevery time
- This makes
Expected Output:

3.)Command
sudo chown $(whoiam):$(whoiam) $HOME/.kube/configExplanation:
-
- Gives your normal user access to the config file
-
- Allows running
velawithoutsudo
- Allows running
Expected Output:

4.)Command:
export KUBECONFIG=$HOME/.kube/configExplanation:
-
- Makes tools always use the saved config file
-
- Connects
velato your local cluster
- Connects
Expected Output:

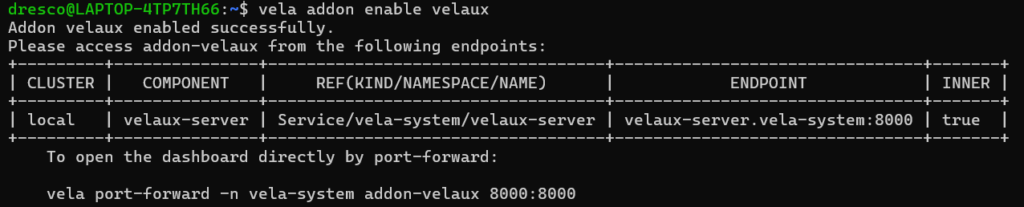
5.)Command:
vela addon enable velauxExplanation:
-
- Installs the VelaUX UI addon inside the cluster
-
- Lets you manage apps from a web browser
Expected Output:
Create an Application YAML File
1.)Command:
nano webservice.yamlExplanation:
-
- Opens a simple terminal editor
-
- You write your application definition here
-
- Save with
Ctrl+O, exit withCtrl+X
- Save with
Expected Output:

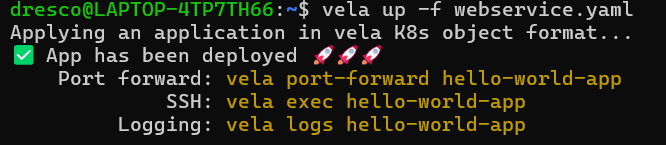
Application Successfully Deployed
vela up -f webservice.yamlExplanation:
-
- Reads the YAML file
-
- Creates and deploys the application to KubeVela
-
- Starts the app inside the local Kubernetes cluster
-
- Shows “App has been deployed” when successful
Expected Output:
Access the Application Locally with vela port-forward
Only after deployment, you forward the port.
1.)command:
sudo kubectl port-forward -n vela system velaux-server-6c8fc96bb8-568x5 8080:8000Explanation:
-
sudo→ Run the command with administrator privileges.
-
kubectl port-forward→ Forward a pod’s port to your local machine.
-
-n vela-system→ Namespace where the pod is running.
-
velaux-server-6c8fc96bb8-568x5→ The pod name you want to access.
-
8080:8000→ Map local port 8080 → pod port 8000.
Expected Output:

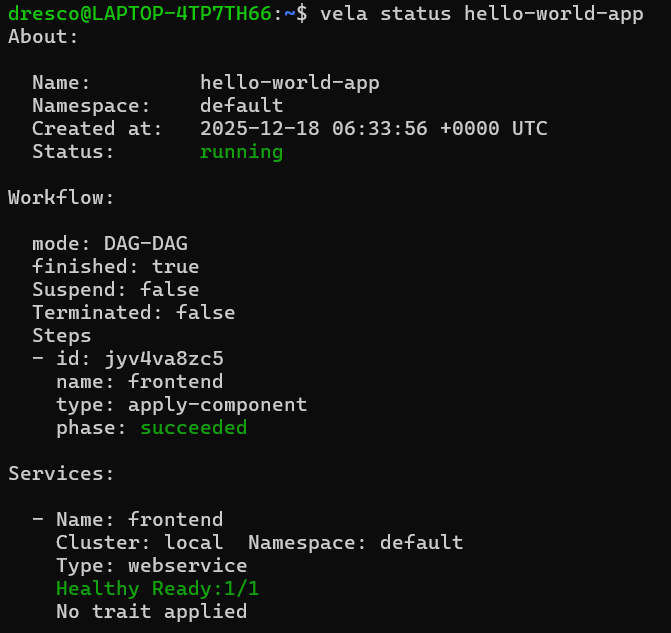
Check if Your Application is Running
Command:
vela status hello-world-appExplanation:
-
- v
ela status→ Checks the current state of a KubeVela application.
- v
-
hello-world-app→ The name of your deployed application
Expected Output:
conclusion:
KubeVela has been successfully installed in standalone mode on the Kubernetes cluster, providing a modern platform for cloud-native application delivery. Applications are treated as first-class objects, which simplifies deployment and management. The workflow, from creating a YAML file to running vela up, port-forwarding, and checking status, ensures a smooth and observable deployment process. vela status offers real-time insights into application health, components, and traits, while port-forwarding allows easy local access for testing. KubeVela supports reusable components and traits, enabling extensibility and scalable deployments. Developers and operators can work independently thanks to separation of concerns, improving team productivity. The platform works seamlessly across multi-cloud and hybrid environments without modifying application definitions. Its beginner-friendly CLI commands make it accessible for newcomers to Kubernetes. Overall, KubeVela provides a robust, flexible, and efficient approach to application delivery. This installation demonstrates how teams can achieve scalable, observable, and maintainable cloud-native deployments with minimal complexity